How to Free Up Space on Mac: the Ultimate Guide
It usually starts with the dreaded “Your disk is almost full” popup. When you see it, you start wondering how you managed to fill your Mac’s SSD that quickly - it looked almost limitless when you first got the machine!
Running low on disk space is perhaps the most common computer problem around the world, which got worsened by the Covid-19 lockdown - people started using their computers a lot more, downloading and saving more bulky content like movies. Considering that movies in HD quality take up around 3GB on average, a MacBook Air’s 256GB SSD can fill up really quickly. You could, of course, start paying for 50GB of iCloud storage for $0.99/month but we recommend that you free up space on your Mac by deleting stuff you don’t need first. In this article, we’ll show you how.
How Does a Full Drive Affect Your Mac’s Performance?
If you think that a full hard drive has little to do with your Mac’s speed and performance, you’re wrong. As soon as your SSD or HDD gets filled up to about 80%, your Mac will get a lot slower. If you use an SSD, then you won’t get affected that much (although your RAM usage will skyrocket to compensate for the full disk). But if your Mac has a traditional HDD, then disk fragmentation will grind your nearly full drive to a halt.
The solution? Recover as much free space as you can!
Check What Takes Up All the Space
The first thing to do before you start deleting things is to check what type of files occupy the most of your storage space. To do that, click on the Apple icon, select About This Mac and go to the Storage tab.
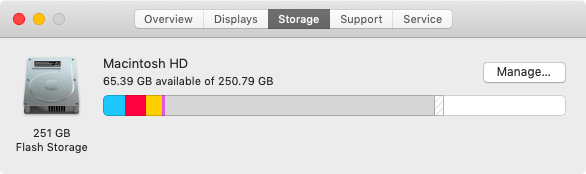
Hover over a cluster and your Mac will tell you if these files are documents, photos, movies or something else.
If you see that System takes up a lot of space, remember that all kinds of caches, unneeded and unused languages, and temporary files are included in your Mac’s calculations.
Ways to Free Up Disk Space on Mac
Delete Unneeded Large Files
When you want to free up space, the first thing to do is to find and delete large files you don’t need, especially old ZIP archives and DMG files. Using the Spotlight search feature will help you do that:
- Go to the desktop and press Cmd+F
- Make sure “This Mac” is chosen so that you’re searching your whole computer
- In the “Kind” drop-down menu, select “Other…”
- A new popup will appear. Select “File Size” and “File Extension” there, then click “OK”
- Now search for different file extensions (like .dmg, .zip and .rar) and sort the search results by size
- Delete the large files you don’t need
This way you will be able to find and delete all kinds of large files you don’t need. True, this process requires some time but it’s well worth it.
Remove Apps You Don’t Use
Everybody loves trying out new software especially free apps - there are so many of them available on Apple’s App Store! The problem is that we don’t continue using all these apps and simply forget all about them.
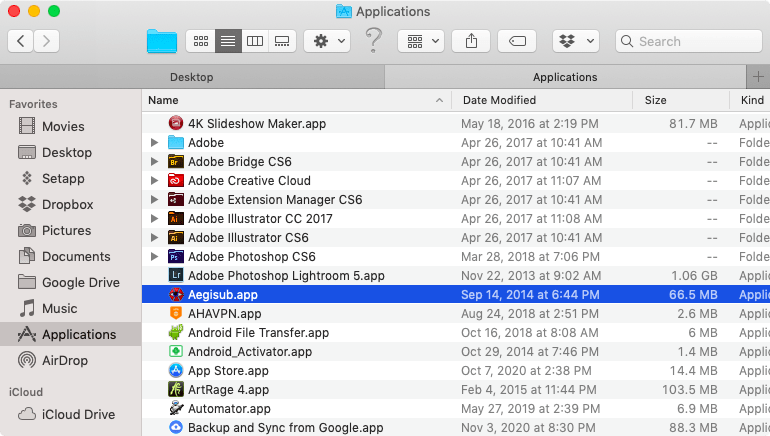
Apps can occupy a lot of disk space on your Mac. Deleting the ones you don’t use can potentially free up as much as 5GB - now that’s a lot of space!
To uninstall an app from your Mac, simply open the “Applications” folder, browse through the apps and see which ones you don’t need. Click on an app to highlight it and then press Cmd+Delete to remove it. It’s that easy!
Delete Duplicate Files
Another great way to free up space on Mac is deleting duplicate files. Don’t confuse these files with backups or intentional copies - duplicates do nothing more than waste disk space and make things confusing. Deleting them can save up gigabytes of space, especially if you have lots of duplicate movies, songs or photos.
The easiest way to find and delete duplicate files from your Mac, Mac Mail, and Cloud storage is with the help of Easy Duplicate Finder. Here’s how:
- Download and install Easy Duplicate Finder for Mac
- Launch the app and grant it the necessary permissions if prompted
- Scan your Pictures, Music, Documents and Movies folders for duplicate files
- When the scan is finished, review the results and delete the duplicates in one click
Easy Duplicate Finder will select duplicate files automatically but you can always change the selection with the help of the bulk selection options or by checking individual checkboxes.
Clear Browser Cache
If you use the Internet a lot, your browser cache could get really bloated and take up a lot of space on your Mac. Clearing the cache regularly will help you to keep your browser fast and redeem quite a bit of disk space.
To clear Safari cache, click “Develop” in the menu and then click on “Empty caches”.
To clear Google Chrome cache, click on the menu icon (three dots), head over to “More Tools” and click on “Clear browsing data”. Choose a time range (“All time” is recommended) and make sure the “Cached image files” option is selected.
Empty the Trash Can
Another thing you can do to get more free space on your Mac is empty the Trash. It’s really simple - right-click on the trash can and select Empty Trash. That’s all there is to it!
Now you know how to free up space on your Mac!
Tech Tips
- How to Display Hidden Files and Folders in Windows 11
- Why it's Important to Delete Duplicate Files on Windows PC or Mac
- Why It's Important to Delete Empty Folders in Windows
- How to Remove Duplicate Files from OneDrive?
- How to Manage Duplicate Files on Google Drive?
- Dropbox: Find Duplicates in Your Cloud Storage with Ease
- How to Compare Two Drives for Duplicate Files
- How to Use a Duplicate Video Finder to Manage Your Movie Library
- The Ultimate Guide for Choosing the Best Duplicate File Remover
- How to Find and Remove Duplicate Files on Windows and Mac
- Top 5 Tips to Help You Organize Your Files and Folders
- How to Free Up Space on Mac: the Ultimate Guide
- 10 Tips and Tricks for Working with Files on Your Windows 10 PC
- How to Effectively Manage Storage Space on Your Work Computer
- 5 Ways Duplicate Files Are Ruining Your Productivity
- 5 Great Ways to Clean Up Your Google Drive
- How to View Disk Space Usage on Windows and Manage It Effectively
- 5 Mistakes that Are Slowing Down Your Computer
- Computer Cleanup Challenge: Declutter Your PC in Less Than 10 Minutes
- How to Find Duplicate Photos on Your Laptop (and Get Rid of Them!)
- Tips and Tricks to Increase Google Drive Space without Upgrading Your Plan
- Why Does Dropbox Duplicate Files and How to Stop That from Happening
- How to Delete Duplicate Contacts in Outlook
- Manage Duplicate Files to Recover Disk Space
- How to Find and Delete Duplicate Files with Easy Duplicate Finder™